Friday, June 21, 2013

Doggy Days of Summer

With the Mothers Day Historic Home Tour (see previous post) behind me as well as the local fire station open house on June 1 that I helped coordinate, I’m feeling much more relaxed and ready to enjoy some down time.  I’ve also closed a chapter and am preparing to start a new one.  I moved out of my space at the Rustic Sparrow a week ago.  Sales were slowing down there and it just wasn’t fun anymore.  Now I have a storage space and half of my garage full of merchandise like this last item I painted but I will find homes for all of it in another way and then I’ll move on to something else.

It feels a little strange; I still see a piece of furniture and begin thinking about what I would do with it but there’s no longer a reason to do that.  I guess it’s a habit that I’ll be able to end after a few conversations with myself. 

Ending that chapter doesn’t mean I’ll stop being creative – that much I know.  I’ll be working on my home more and possible doing some custom work or creating smaller items that can be sold on etsy – when I’m ready.

I do have other news.  I’m fostering an adorable little two-year-old corgi/dachshund/Chihuahua mix and odds are I’ll be officially adopting her in a couple of weeks. 


Maisie Grace tugged at my heart when I saw her at an adoption event 2 weeks ago.  She has a delicate little face I loved at first sight.  Unfortunately, she had recently given birth to a litter of 4 very cute puppies and she was somewhat emaciated.  You could see the vertebrae in her back, her ribs, and her hips.  She practically inhaled the first serving of kibble provided by the rescue group so I stepped up the amount they’d recommended and increased the number of feedings, switching to puppy food.  Within a week she looked less gaunt and had more energy.  Two weeks later, she’s VERY full of energy and has filled out beautifully and the hair she lost as a result of her pregnancy is coming in and looking much more Corgi-like.

When I first picked her up at the adoption event, Maisie practically hugged me back, laid her head against my neck and we were  bonded.  For the next 2-3 days, she was usually in my arms or lap and part of me wondered if I was creating a monster that would insist on being carried everywhere.  Fortunately, not so – and my gut instinct was right - as her strength returned, she was at first willing to get down and stay nearby but it wasn’t long before she began to head off and explore on her own.  Now she’s a feisty little thing who lets pedestrians on her sidewalk know just whose house this is.

On the ride home, I was thrilled Maisie was to become part of my life but I wondered how she would do with my lab-mix, Flame.  Flame is 12 years old and medium sized but I’ve seen what he can do to a young possum and it isn’t pretty.  It didn’t turn out to be a problem. When they met, I could see that he was a little anxious, but very tolerant and they quietly approved of each other.  Two days later, Maisie decided to play and Flame rose to the occasion.  I have never seen him play with another dog and at his age, I didn’t expect him to learn how, but he did and, oh my!  They have a blast!  Maisie climbs up on him and bops him in the face with her paw and they’re off!  I keep waiting for Flame, who looks huge next to her, to step on Maise while they play but he hasn’t yet – he’s gentle but I see they’re both having a great time.  I’ve noticed that Maisie even snuggles into him sometimes and they have mutual face-licking moments.  It does my heart good to see that.  They like to walk side-by-side when I take them out.


So now I play catch up with details in my life I’d set aside during my typically hectic spring and hang out with my 4-legged kids.   


Sounds like a great way to spend the summer.  After that, who knows!

Saturday, May 25, 2013

Oh no, nearly a year has passed by since my last posting.  Plenty has happened since then; after only 6 months my (elderly) first renter needed to move back in with his daughter so my little guesthouse became available again in January.  I was taking time to improve it more, including badly needed paint in every room and a better arrangement for the kitchen cabinets and counter across from the sink when someone interested in renting suddenly contacted me and the time frame was suddenly bumped up A LOT.  I was able to have nearly everything ready for her in early March and I’m very pleased with the new tenant, who is also retired and has written professionally.  She’s truly enjoying the little cottage and has decorated it nicely.  

In April I learned that my house would be on our Historic District’s Mothers Day Home Tour.  I already do quite a bit for that event, including running it, designing the tickets and 28-page program, along with doing the publicity and handling pre-event ticket sales, so adding all the odds and ends around my house and yard were a wee bit stressful!  Thanks to the help of friends, I was able to pull it off, though.  My new tenant was gracious enough to help with the garden and also allowed the approximately 800 visitors through her house, too.  I’m impressed that after only a couple of months, she has decorated her little place both attractively and efficiently. 

Among the things on my to-do list was re-painting my dining room set.  The photo shows a chair back before distressed and antiqued it.  


The set looks perfect next to my latest acquisition, a magnificent wooden soda cooler with marvelous patina.    The painting above is one I did years ago, based on Van Gogh’s dreary “Potato Eaters.”  I livened it up just a bit and named it “The Cookie Eaters.”


I also worked on my backyard.  Those photos will come in a future post - and I look forward to writing it before another 10 months go by!


Tuesday, July 17, 2012

Rub-a-dub-dub - One Artist in a Tub

  Oh dear, time has flown by again since my last post.  One of my recent projects has been to prepare my guest house to be rented.  Finding a renter was easy; the rest took time.  The tiny bungalow needed a new kitchen sink and counter, a kitchen stove, a bathroom floor, a water heater, and hook-ups for a washer and dryer.  At last, I've finished the job and my renter is happily ensconced in his "new digs."

Here's a photo of my guest house, built in 1927. These are the original colors.  The railings were added to make it safer for my mother and uncle who lived here for several years.


Before my mother and uncle moved in about seven years ago, I removed the icky plastic bathtub surround and decided the bathtub needed something with a little more character so I dug into my rather large supply of broken china to create a mosaic. My first and only other project had been a ten-foot-long outdoor kitchen counter and this seemed like a piece of cake. Except that I had a much tighter time frame. After days upon days of standing in the bathtub, choosing exactly which piece would be perfect for each spot, I opted to simplify by adding some plain white square tiles to fill space and I like the break it provided and the way it emphasizes the rest of the design - and I guess others like it, too. A few months later my home and this guest house were on our Historic District's annual Mothers Day Home Tour and it's been interesting every since to bump into people who blurt out - "Oh, you're the one with the bathtub!" As I was getting the place ready to rent, a sweet friend insisted that I put pictures of the tub on Pinterest so I decided it was "Blog worthy..."

Here, now, is my now famous bathtub surround.


And, of course, I couldn't leave the toilet paper dispenser unadorned...


I'm sorry to say I haven't done any more mosaics, even though my sister and friends continue to provide me with additions to my broken china collection - thank you!  Soon I plan to start working with it again, though - it should be a nice way to complement some of my painted furniture.  One of these days!

Tuesday, February 28, 2012

My New Painting Trick...

  I love the look of painted checkerboards or diamonds but have always dreaded doing it and haven't been happy with the results.  A short while ago I thought it over and had a huge "aha!" moment.  I decided it would be a snap to lay a piece of Contact paper down, use an X-acto knife or other blade to cut along all the lines, and then lift away the parts you want painted.  I may have over-simplified here, so I'll each step with photos below.  This technique creates nice clean lines and it's MUCH faster than painting each individual square or diamond - give it a try if you like to paint furniture - or even floors or walls!

And, without further ado, my furst "how-to:"

First, paint the background color evenly across the surface where your design will go.  When it is thoroughly dry,  lay a piece of Contact paper down to cover slightly beyond the area where the design will go.  If you need added width, just lay down another piece of Contact paper next to the first, slightly overlapping.  Smooth all the Contact paper down to make sure it's securely attached across the entire surface.  I've used white Contact paper, which is easy to draw your lines on, here on this small table top.


Draw your design.  In this case, I wanted diamonds.  I started with the lines going from corner to corner and then I drew lines from the middle point of each edge to the middle point of the other edge.


Once I was happy with the lines I'd drawn, I used a single-edged razor blade to cut gently through just the Contact paper.  It won't be the end of the world if you cut into the surface slightly but it's better not to.  I would have used an X-acto blade if I'd had one handy.

I then began lifting the pieces covering the areas I wanted to paint.


If you accidentally pull up a wrong piece, you might be able to lay it back into place, otherwise, just use another piece of Contract to cover that area and re-cut.  Once all the areas where you want paint are exposed, make sure the edges are sticking well and won't allow paint underneath.  Then, start applying your paint over the entire surface.  I usually use chalk paint and, so far, have only needed to apply one coat.  If I needed a second coat, I would just leave the Contact paper in place.


Cover the areas that need it with paint. On any project, I tend to remove my masking tape or Contact paper as soon as the paint surface paint is barely dry.  That way, all lines are crisp and the paint doesn't have time to develop a skin that can pull up paint you don't want to lose.    I do tend to let it dry ever so slightly, though, to keep it from being too messy.   I use the same blade I cut the vinyl adhesive paper with to carefully start lifting each piece at a corner.  Here I've removed the first piece.  Check out how crisp those lines are!


Continue to remove all the Contact paper.


Next you'll see that all the Contact paper has been removed.   It took me less than a minute to paint in the areas I needed to on this table.  If I had painted each diamond by hand, it would have taken me an hour or more.  Applying and cutting the Contact paper took about 10 minutes.  This technique is a huge time-saver!  AND the results are excellent!


I painted French blue "coins" (dots) at each corner of the diamonds and used masking tape to create 1" x 1" squares along the edge of the table top.  Once it was all dry, I lightly distressed all surfaces with sandpaper, wiped it down,  and then covered it all with my tinted wax finish.  I also painted diamonds on the front of the drawer using the same Contact paper technique.  Here's the final result, ready to sell in my space at the Rustic Sparrow.


I've also used this for a cute little table I decided should have a checkerboard on top.  I'll have to share that one later.  This technique could be used with free form designs, also.  Or stencil letters onto the Contact paper and cut them out for a quick, easy project.  The possibilities are endless.  Now - go paint something!

I'm looking forward to teaching this and other painting techniques at a workshop on March 10 at the Rustic Sparrow in Downtown Escondido, California.  Maybe I'll see you there!


Copyright 2012 by Carol Rea


Tuesday, February 21, 2012

Wonderfully Busy

  I always believed that retirement meant sitting in a cozy spot reading a good book.  Every once in a while I'd pat the dog on the head or head out to the kitchen for a fresh cup of tea, but for the most part it would be  quiet and restful.  Oh, maybe I'd head to the beach for a walk or I'd bicycle to the store for exercise.

  NOT SO for this woman!  No idea how I've managed it but not only is my plate full to the point of spilling over all edges, but I seem to have multiple plates!  I remain involved with the community - I strongly believe that nobody has a right to complain about anything if he or she doesn't do everything possible to make it right.  And I still help out my uncle, who lives in my guest house.  But I'm truly enjoying my creative side and selling my unique items to help boost my limited income that's challenged by the rising cost of living.  Each piece I paint is unique.  I've been reminded by several friends that I could sell more furniture faster if they were more neutral but I have to say, I just can't do it.  Each piece calls to me and I just have to do what it says.  For example:

  No, this piece will not go into just any home.  I call it "Construction Zone" because of painted stripes and the yellow squares remind me of one.  The cabinet was a drab, damaged art deco piece and the outcome just looks right to me.  So, it sits in its place and waits.  And I believe the right buyer will come.  Any. Day. Now.

  Just a week ago, I had my best week ever at the shop.  I'd had a lovely lunch at a restaurant nearby with friends who had been co-workers for nearly 20 years and they came to see what I've been up to.  One bought my Mother Goose table for her daughter, who is expecting.

 "It's perfect!" She said, and explained that she had read to her daughter from the very same book I had decoupaged on the piece and planned to give her the book along with it.


  Another friend chose the large mirror with a frame I had decoupaged with dictionary pages. Here's a corner of it.

 She wondered if I could customize it for her cabin in Colorado.  Of course!  I plan to have it finished for her to take next time she goes in early March.  It will include her blue/green colors and some woodsy effects.  I can't wait to see what I come up with!

  On the same day, someone purchased my desk and chair set, something that had been in my space nearly from the beginning back in November.  Many had stopped to admire it but that desk just had to wait for just the right owner.


  So the good news was that several pieces had sold but the bad news was that my space looked pretty darned empty and I had very little furniture ready to go.  I did have this piece ready and it went in right away.  (Update 2/22/12 - the piece sold yesterday!)


  And this shabby chic table didn't take long to re-work.  One of my all-time favorites, it had housed some sort of a machine, possibly a sewing machine.  I painted the inside a beautiful shade of blue that will be a beautiful display area and placed a piece of glass over it.  It sold It sold less than 4 hours after I'd placed it.

  Then I plucked another end-table out of the garage and painted it.  I'll show step-by-step how I did a quick job of painting the diamonds on top and on the drawer in a future blog.


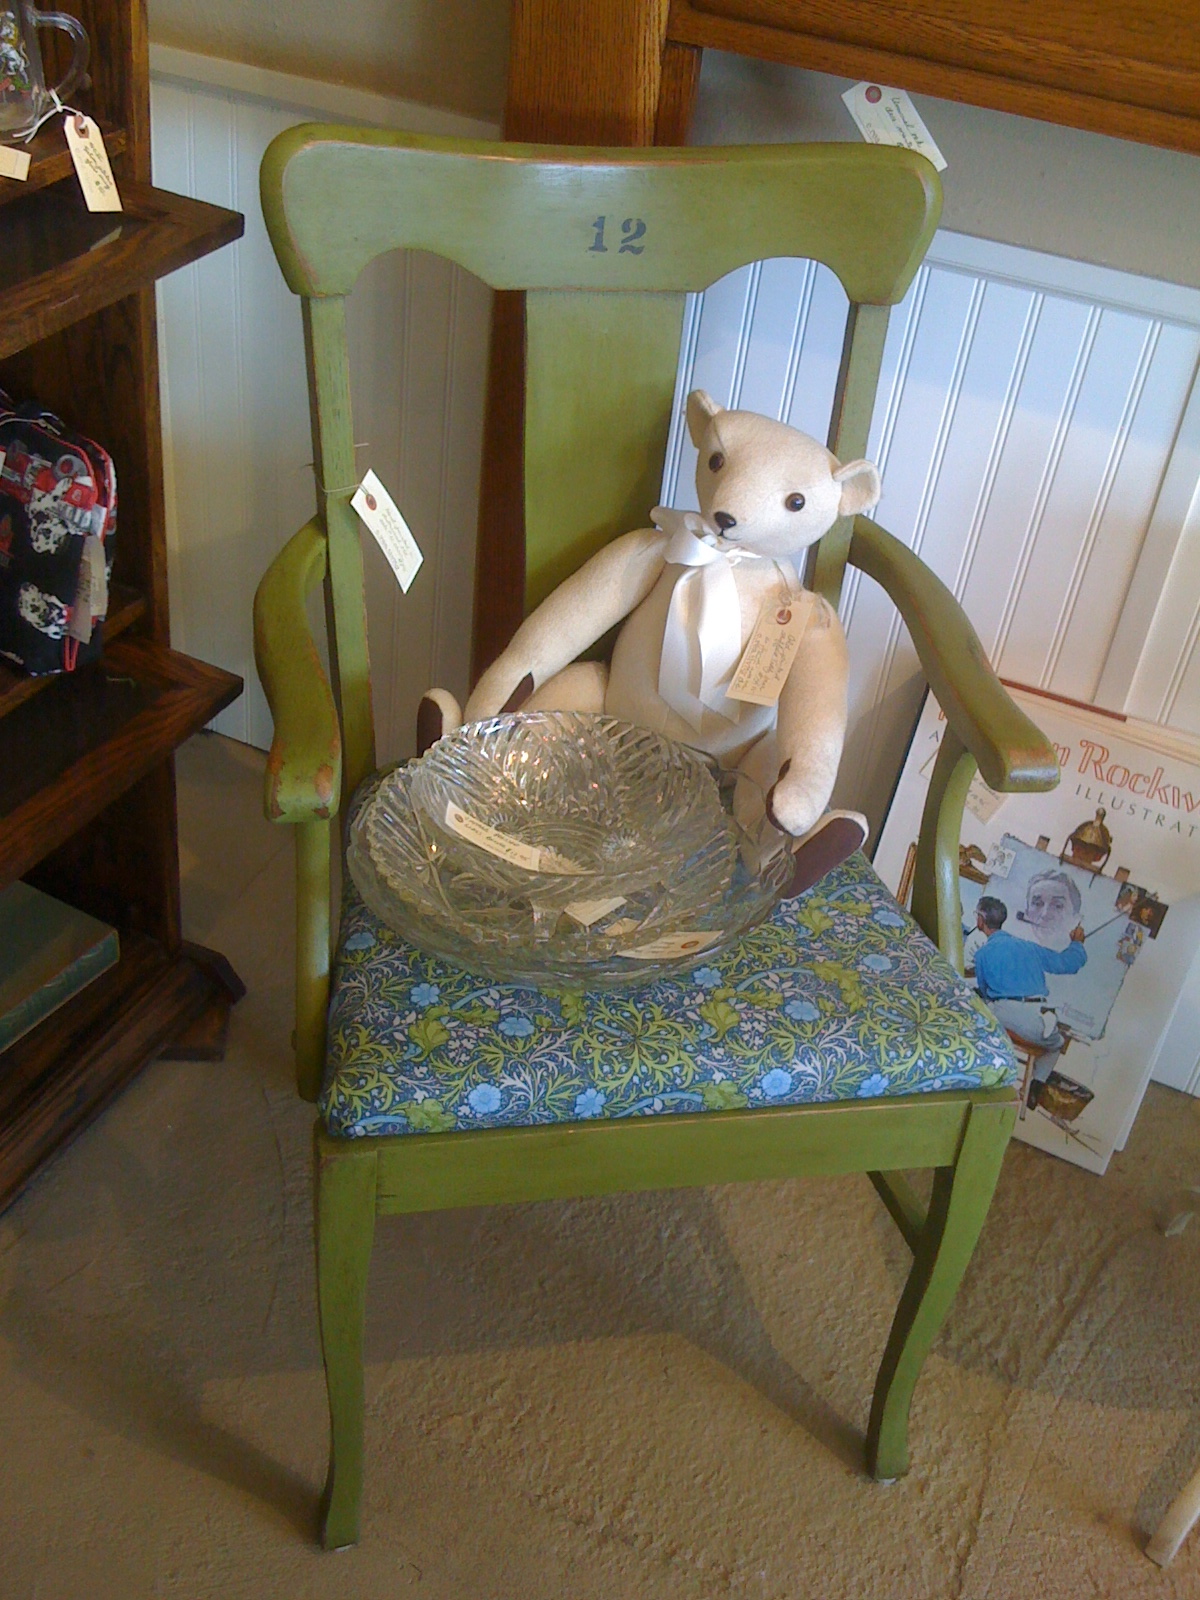
  And then there is the oak chair.  I found it stripped to the original wood but it wasn't in great shape.  Here it is, before, in an unflattering position on its back on my dining room table.  I had wondered what color to paint it when I found just the right fabric for the seat.  Did I dare paint it bright green?


Yes!  Although I toned it down a little when I distressed and added the dark wax.  And I just had to add the number "12."  No idea why I chose 12, but I did.


  What's next?  The same friend who bought the Mother Goose table asked me to keep an eye out for a small trunk that would corral her granddaughter's American Girl doll collection.  I found the perfect candidate the very next day and it's a go.  Here it is in its original tacky state.  Metallic gold and some sort of red paint.


  When I'm finished, it will be a magnificent girly purple and pink!  So, time's flying by and I'd better get moving.  Planning to write again soon but - you know how my retirement is going!

Saturday, January 28, 2012

My Mother's Brushes

  I recently purchased and painted an old china cabinet for storing my painting and crafting supplies and realized that the major amount of glass across the front and sides meant I would need to "pretty up" the contents a little since my art studio also happens to be my dining room off my living room.  An old leather suitcase, an old wooden tool box, and Mason jars did the trick for containing quite a few things with charm, as long as the viewer appreciates the rustic/shabby look.  Then I needed to address my brush storage issue.  And I have a lot of art brushes.
  You see, my mother had a lot of brushes, crammed into a well-tarnished silver pitcher, that I inherited after her death nearly three years ago.  I liked the way they looked and the memories they brought to mind so I had left the whole thing pretty much untouched and on display until just recently, when I began decorative painting again.
  The thing is, my mother was really something - I realized way too late in life.  You know how it is - as a teenager your parents can be SO embarrassing.  But now I appreciate - and miss - her creativity and spontaneity.  That the house would be a mess around her but she would be hand-painting charming flowers on Easter eggs, inspired by her bone china tea cups...  In her baggy flannel pajamas... From afternoon until late into the night.  And I mean real hard-boiled eggs, which, after all her effort were intended to be peeled and eaten.  She also taught me to appreciate well-worn second-hand pieces of furniture and envision them as they could be.  As I now paint my own unique projects, I think of her often and wonder what she would think of a particular piece I was painting.

  Here is a photo of my mother meeting her great grandson for the first time in 2008.  In the background, perched on top of the lovely secretary that had belonged to her mother, is that very special pot of brushes.

  So, I finally decided that she wouldn't be upset with me; that she'd be excited for me, to finally tackle that pitcher of brushes.   I pulled each brush out and sorted them by size, appreciating the bits of paint on the handles that she had left there while tackling her own projects.  Most of them were very high quality, big brushes, so the pitcher became my "big brush" pot where those brushes could feel at home.  The smaller brushes were added to my own, in a couple of tin cans (which will be decorated later), and the more specialized painting tools were added to a favorite Windsor Newton pot my sister had given me years ago.  I think I like the look.  And I really enjoy using Mom's brushes now - as if her hand is still on each, guiding mine.


Thanks, Mom.  I still miss you.

Thursday, December 8, 2011

The End of the Year Draws Near

  Things have gone well at the Rustic Sparrow.  Mid-month the first space on the east side of the shop, including the window display area, became available.  After some brief soul-searching, wondering if we can justify the additional rent, Doug and I decided to go for it; we moved from the very last space to the very first one!  This was a different-shaped space and the pressure was on to create a display that would entice customers to come into the store, but we were up to the challenge and I think we did a fine job.

  Thanks to a couple of events - a wine/beer/cheese tasting event sponsored by the Downtown Business Association and the national Small Business Saturday, we had a successful November and December - meaning that, at the least, we were able to pay the rent.

  This week I finally made a sign to identify our space and today we hung it up.  What a great feeling that was!  Here's how it looks.


  Things are piling up in my dining room that need paint and some assembly.  Today I worked on 3 birdhouses I've gathered along the way and I really enjoyed pulling items together from the basement and sewing basket to make them a little different.  I look forward to sharing photos of them, although I know I still need to post some photos of my re-designed dining room.  Then again, since the last post,  I needed the barrister bookcase that held my supplies to use in the shop to display merchandise, so it's gone and an interesting art deco armoire from the garage replaced it.  Unfortunately, it's not working as well as I'd hoped and the place is not nearly as organized as I'd like, but that's okay - I'll paint it (the wood finish has been damaged) and off to the shop it will go, to be replaced by something else I'll come up with.

  In other words, I'm still greatly enjoying these opportunities to be creative.  I find myself getting grumpy if I have to put aside my paints for a day or two to take care of other priorities.  And another benefit has been meeting some wonderful other "furniture painters" through Facebook and their blogs.  I had no idea how many women (and some men) like me are enjoying the same artistic outlet I am - all over the world - and they have precious stories of their own to share!

Friday, November 4, 2011

And now it's November?

Time has flown since my last post as October was starting.  At the time, I was beginning a new venture - a sales space at the new cooperative market place downtown, the Rustic Sparrow.  Well, now the space is up and running, and full of items for sale.  

I've also gained a partner in the endeavor.  My neighbor and long-time friend, Doug Eagleson is displaying quite a number of items and doing reasonably well.  I'm forever grateful that he's willing to help me move large pieces into place and even help spruce up some items now and then.  He also did some of the painting for me when I first set up.

Many of the pieces I'm selling are former "projects" that were sitting in my house, garage, or basement and never completed.  To have a tiny bungalow with so much stuff has not been a good thing so being able to finish things and put them up for sale for others to enjoy has been very practical.  What I've discovered is that painting and renewing items is a source of great joy - a truly creative opportunity.  A cabinet that was in my bedroom but relegated to the basement had a satisfactory coat of paint on it but I was able to add more paint, distress it, add a reproduction of a vintage print, and now it's an especially charming piece ready to find a home.  


Even though I didn't need to, I purchased some items at garage sales a couple of weeks ago, including a 2-drawer nightstand that had been a dark wood in a heavy Spanish style typical of the 70s, later painted white to look shabby chic but still not quite working.  I painted it in my favorite new shade of blue with touches of green and yellow, decoupaged some birds and flowers on it, and I love it; I can imagine a little girl enjoying it in her bedroom.


The new challenge has been finding a place where I can paint and create my furniture transformations.  My home office/TV room just doesn't have enough room; the garage and basement will be too cold (and uninspiring) this winter, and that left me smack dab in the middle of my dining room.  It actually felt pretty good to get rid of furniture with minor function that had been in the dining room; in its place I brought in a barrister's book case that had been sitting in the garage.  On top of it sit an old silver pitcher and a crystal biscuit container for all my brushes and inside the book case are my paints, brushes, tools, sandpaper, and miscellaneous other items I need while I work - and it's absolutely great!  I can enjoy the view out of my French doors or the front living room windows, and watch TV while having everything at hand.  A large cardboard moving box, flattened, covers and protects my dining room table.  I've even replaced the chandelier mentioned in a previous post with something that creates more light and casts fewer shadows.   It's a different look - but definitely one I'm enjoying.   I'll take some photos and provide a tour in a future blog, hopefully very soon.

Saturday, September 24, 2011

Is it really almost October?

  I can't believe how time has flown by.  I thought I was getting my house ready for our Old Escondido Mothers Day Home Tour last May but my attention was diverted to working on our city's entry in the America in Bloom competition and numerous other distractions.  Luckily another house became available to include in the tour so I was off the hook for 2011.  Looks like my bungalow will be on the 2012 tour instead, though I'm not sure.  Whether or not it is, I still need to paint the kitchen - which still has sample splotches of colors I'm considering from last year.  And the kitchen in the guest house needs to be finished.  So many projects, so little time!

  In the meantime, I've taken a leap of faith and opened a space in an adorable boutique in Downtown Escondido; the Rustic Sparrow.  I'd placed my name on the waiting list when they opened and learned that a spot was available in a new area to the rear of the store just last Wednesday.  On Thursday I gathered some items together to display and started painting the walls around my space.  Yesterday, I finished the faux paint job on the rear wall that was inspired by the funky electrical boxes on the side wall -  I'm calling it factory chic.  Here's a photo, just as I was finishing painting.


I was able to stage a few big items and smaller ones before last night's start of the next-to-last Cruisin' Grand event of the season.  I hope to add quite a few more over the next week and then I get to continue maintaining and adding to it.  Looks like I'll be even busier than ever, but I guess that's what my retirement looks like!

Sunday, February 6, 2011

Ring-aling-aling - it's for you!

  My 1931 bungalow has a little shelf in the corner of the hallway for a telephone.  Directly underneath is a small vented cabinet that used to hold the telephone workings.  I've never done anything special to it and the jack for a phone had been removed before I moved in.  A few years ago, I picked up a cute vintage reproduction phone and recently plopped it on the shelf, just for looks.  When some friends came by for lunch a couple of weeks ago, one asked if the old phone actually worked and I had to say no.   Giving it some thought, I picked up a double connector at Home Depot and headed down to the basement where I was able to connect it into the existing line and voila!  I now have a working phone in the hallway again.


The oil paintings hanging above the phone shelf are of my parents, painted by my mother's cousin many years ago.

Friday, January 14, 2011

New Old Chandelier

  In the transition from shabby chic to country French, my living/dining room had one item that seriously needed to be changed out; the chandelier over the dining room table.  It was still the white I had painted it a few years ago with white lamp shades and a pear-shaped crystal tied with very thin pink ribbon to each arm.  One long slender crystal Christmas ornament hung from the middle and miniature silk ivy softened the lines, intertwined through the chain and encircling the arms.  It looked sweet before but, against the more sophisticated black accents and tan walls, it just stuck out like a sore thumb.

I searched on line and at a couple of thrift stores for something to replace it at a price I can afford right now ($25 or less!) but didn't find anything.  One morning, while waiting for a friend to get ready so that we could go somewhere, it occurred to me that paint had transformed this simple chandelier once before and maybe it could one more time.  Bingo, out came the craft paints and a paint brush and it was quickly painted black.  Back from my outing, I remembered something I'd seen on the Internet, an "electric" candle decorated by wrapping old music around it, so I dug out a cookbook I'd accidentally left outdoors with the recipes interestingly hand-printed, and began cutting it up.  I wrapped each candle in part of a recipe.  

Now the lampshades were too bright white, so I really thinned down some brown craft paint with water and brushed it on for a tea-stain effect.  It took two "coats" but did the trick.  The crystals didn't look quite right with it now so I did a lot of thinking, went to a local shop specializing in wonderful country French decor items (the Urban Barn) and thought some more.  I wound up cutting hearts out of the recipe book and tying one to each arm with a lovely hemp string.  While I was buying the hemp string at Michaels, I found a lovely inch-wide tan satin ribbon that could be laced through the weathered brass chain I brought up from the basement.  A leftover piece was just the right size for a bow to hang down from the center.  I'm very pleased with the finished product, which wound up costing less than $7!  Well, then again, I think I'll pick up some thin wooden hearts and apply a recipe to each side because the paper tends to hang askew.


  I still have some work to do before the living room and dining room are finished, but the overall look is definitely much closer to what I'm shooting for!  Which is a good thing, because I hope to tackle re-painting the kitchen soon - and with my home on the Home Tour this coming Mothers Day, the clock is ticking!

Tuesday, December 21, 2010

Simple Christmas

  On Saturday I said my last good bye to my beloved corgi-basset mix and, what with the fireplace work and all the rain we've had, decorating the house for Christmas has been a challenge.  I decided to keep things simple and in line with the slightly rustic Country French look I have going, so here is my Christmas tree.


  I managed to pull the very sparse artificial tree (the safest! and best for me to avoid allergy problems) out of the basement and added one single string of white lights, a few miniature grape vine wreaths that were in my craft closet,  and a rustic fabric ribbon, also from the craft closet.

  Because I seem to be appreciating friends and family even more this season, I decided to print out their photos on ivory card stock, in muted colors, and simply punch a hole to hang each one on the tree, too.  It's probably the simplest tree I've ever displayed but I love it more than anything I've ever done.  A closer shot follows.


  The middle top photo is one of my sisters, Bonnie and Stephanie, sitting at their new card table at Christmas many years ago and it's flanked by photos of my grandchildren, Andrew and Christina.  Below them are photos of dogs Beau, whose spirit is still with me for Christmas this year and Flame, who is my comfort in our loss.  At the bottom are my granddaughter again and a photograph of my sister, Bonnie, brother-in-law Earl, and me at my son's wedding just a few years ago.  Other "ornaments" include photos of my mom; my grandmother; dear family friend, Scotty; my son, Chris, and daughter-in-law Andrea; and more.


  Oh and there's also this, something I found on the Internet and printed - a stitchery that says "Happiness is a place between too little and too much."  And I think that's exactly where my tree sits.

  May your Christmas be in a place between too little and too much - with plenty of love and God's blessings but not  too much distraction from enjoying both.

Monday, December 20, 2010

Merry Christmas - almost

  I can't believe that Christmas is nearly here.  No surprise that I'm not exactly ready.  Two weeks ago, work was begun on a mantel for my very plain fireplace wall.  Two small windows above flanked both sides of the fireplace, which was a small square hole surrounded by a single row of tiles as you can see in the photo.   Not especially exciting.  
I didn't have much money to spend, so I started thinking of something easy to do.  I knew I wanted the mantel top to go from wall to wall, a span of 12 feet.  I also knew that, as much as I like the look of shelves on either side, I didn't have an inch to spare in my tiny bungalow living room.  The mantel shelf would only be 6 inches deep and a friend suggested treating the lower half differently from the top, maybe using bead board.  That sounded like a winning idea.  Then I decided I would pay someone to do the work as the very hard lath and plaster made me pretty nervous at the thought of nailing into it.  Bead board turned into a board and batten style panelling and eventually into recessed panels.

  I was able to find a nice, straight, clean 2 x 6 for the mantel shelf, good enough to be stained rather than painted.  The design evolved as we worked on it.  The carpenter I hired, Dave, would show up each morning waiting to hear what I was going to change that day.  He and I considered each design option as it came to either one of us and then we called in the tie-breaker, my professional painter and decorator best friend across the street who would also agree to stain and varnish the mantel shelf.  After a week and a half, paying about three times what I'd hoped for, I have a wonderful look that really enlarges the room and creates a fabulous focal point.  Just in time for Christmas.  
 
  Someday, when I have the money and know what I want to do, I'll improve the fireplace surround.  I hope to be able to keep the original tiles without damaging them, maybe covering them and extending the treatment to the mantel.  I'll also need to do something with the plain concrete hearth.  But for  now black paint finishes off that space and all I have to do is to hang the stockings!


Monday, October 11, 2010

Stepping Out

  I had dinner with a good friend last night who chewed me out for not letting her know that I've started a blog.  You see, it's been my little secret with all of two followers I'd allowed in on it.  I just wasn't sure where I'd go with this blog but I admit that I enjoy sharing words and photos.  I'm not exactly prolific at this point and I thought it was mostly self-indulgent blather about my latest progress decorating my little bungalow.  But Wendy ranted and raved just enough to make me think that what I post might be of interest to others out there, so here I am, going a little more public.

  On the one hand, I'm not sure how far I can go with this - how much more can I say about my 750-square-foot home?  And the 650-square-foot rental in the back and the small back yard with several levels.  But on the other hand, I'm also preparing it for our Historic District's Mothers Day Home Tour this coming May, so there could be some interesting things coming up.  So, I guess I'm stepping out and letting the world in.

And with that, I say - Welcome to my home.

Wednesday, October 6, 2010

Improving the Inside

  Just in time for the cooler - and wetter - weather, my decorating interests have moved from the garden to the indoors.  I did some serious de-cluttering in my (adjoining) living and dining rooms and then painted them both; warm tan walls, white trim, and black - yes, black - doors and window sashes.   This plate that I'm now displaying reflects my latest approach to decorating - and life.

Written on the plate: To live content with small means, to seek elegance rather than luxury, and refinement rather than fashion.  To be worthy, not respectable, wealthy not rich, to study hard, think quietly, talk gently, act frankly.  To listen to stars and birds, to babes and sages with open heart: to bear all cheerfully, do all bravely, await occasions, hurry never.  In a word, to let the spiritual, unbidden and unconscious grow up through the common.  This is to be my symphony.  Channing

 I'm trying to avoid purchasing anything whenever possible so I'm re-arranging and, as needed, getting creative.  I'm using vintage linens as curtains.  The center window curtain is a square table cloth and the side windows are just barely covered by very dainty hand towels.


  Some items I'm using again have been freed from previous banishment to the basement.  Others re-arranged and/or painted.  I've also added a couple of things that were special to my mom, like the fancy pettit point chair in the corner below.  I like what I've done so far; it's more comfortable and seems more spacious and, best of all - easier to clean!


  Yesterday,  I did a couple of little things with the kitchen, too.  Inspired by a friend's blog that featured her beloved bulletin board, I decided I needed a bulletin board, too.   Off to my basement again, I found a cabinet door with perforated metal insert given to me quite some time ago by another friend.  Cleaned up and hung on the wall, it fits perfectly in the spot next to the back door and a variety of magnets hold my "stuff" in place.  An odd set of keys hangs from what was the friction latch that held the cabinet door closed.


    Cleared of the magnets and items now filling the bulletin board, my 1934 monitor top refrigerator looks much happier and that corner has a fun new look!


  I'll miss reading in my garden this winter, but with the new look of my cozy interior, I'm sure I'll enjoy some quiet time inside, making plans for the spring, which may include having my re-decorated home on our Historic District's home tour again!